
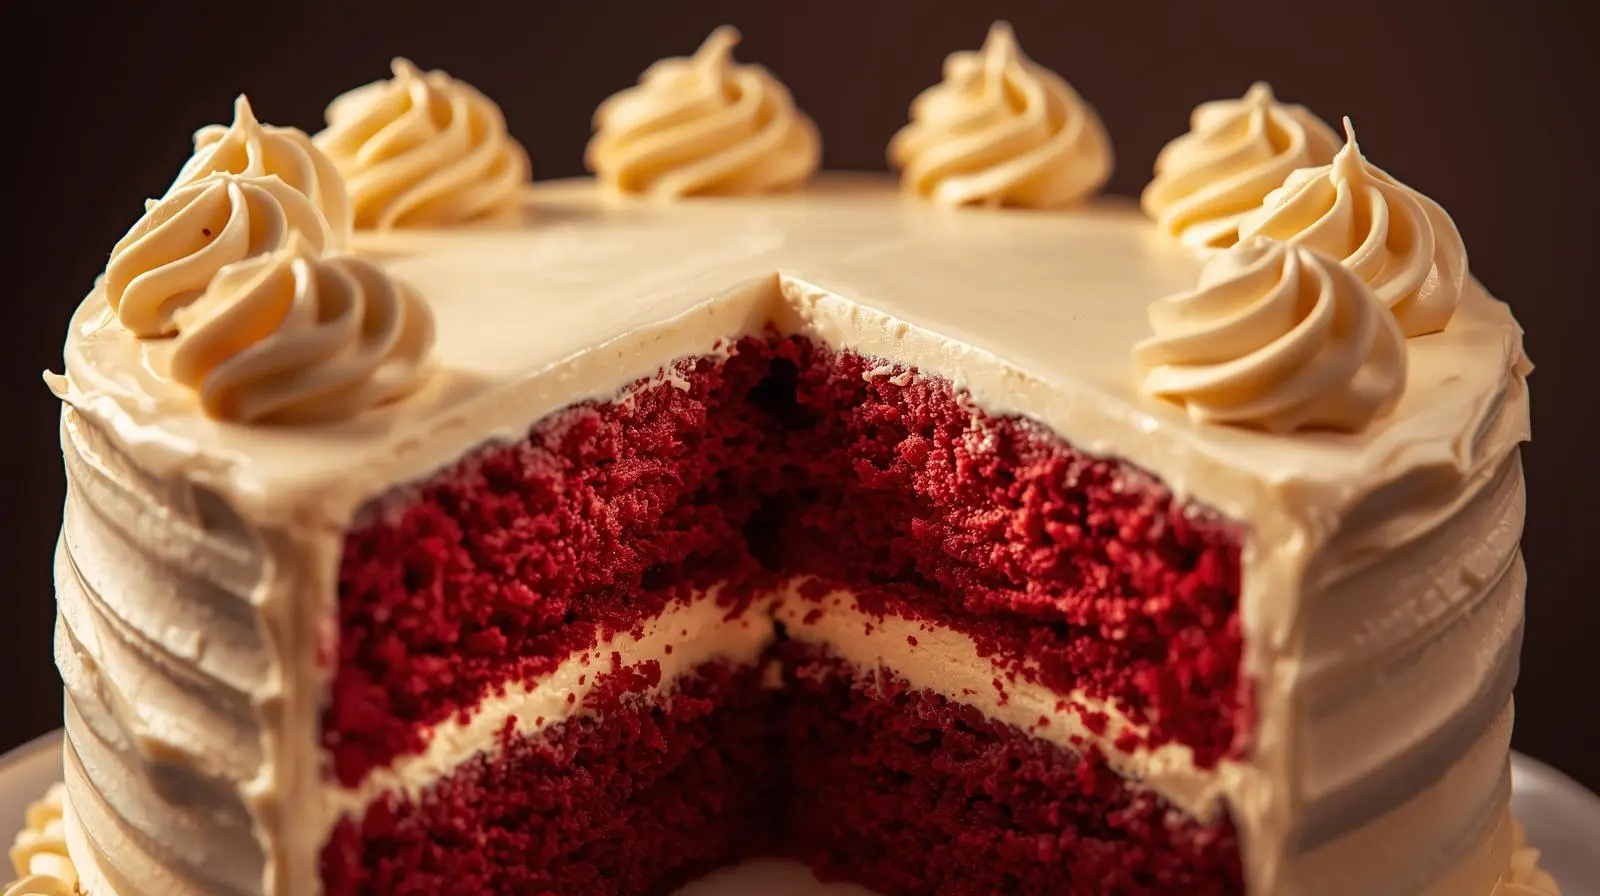
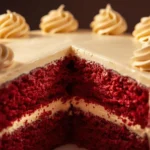
Have you ever been drawn to a decadent red velvet cake at a special event? This dessert is famous for its rich taste and moist feel. It’s a hit with many people.
The classic red velvet cake is often served with a cream cheese frosting. This frosting brings a tangy touch to the cake’s cocoa taste. Its elegant look makes it a top choice for weddings, holidays, and other big events.
Key Takeaways
- Red velvet cake is a classic American dessert.
- It’s known for its moist texture and rich flavor.
- Cream cheese frosting is a traditional pairing.
- The cake’s elegant appearance makes it perfect for special occasions.
- Red velvet cake is a decadent treat that’s sure to impress.
The Rich History of Red Velvet Cake
Exploring the history of red velvet cake reveals its journey from a simple treat to an American favorite. It all started in the Victorian Era, a time of creative baking and fancy desserts.
Origins in the Victorian Era
The Victorian Era was all about elaborate baking. Red velvet cake became a hit during this time. It was made with cocoa powder, which gave it its unique color.
Evolution into an American Classic
When European settlers arrived in America, they brought their baking traditions. Red velvet cake evolved, using local ingredients and becoming a key part of Southern cuisine.
Modern Popularity and Cultural Significance
Now, red velvet cake is loved all over the United States. It’s often served at big events. Its delicious flavor and eye-catching look make it a top choice for many.
| Era | Characteristics | Impact on Red Velvet Cake |
|---|---|---|
| Victorian Era | Elaborate baking, innovative ingredients | Origins of red velvet cake |
| American Era | Local ingredients, Southern cuisine influence | Evolution into an American classic |
| Modern Era | Mass production, cultural significance | Widespread popularity and cultural icon |
What Makes Red Velvet Cake So Special
Red velvet cake is loved for its moist texture and rich frosting. It’s a treat for both the eyes and taste buds. Its unique qualities have won many hearts.
The Science Behind the Vibrant Color
The cake’s red color is not just pretty; it’s a science. A reaction between cocoa powder and buttermilk creates this color.
Natural vs. Artificial Coloring
Some recipes use artificial coloring for the red color. But, traditional recipes use natural ingredients. Beetroot or other natural agents can create a range of red shades.
| Coloring Method | Resulting Color | Ingredients Used |
|---|---|---|
| Natural | Deep Red to Soft Pink | Beetroot, Cocoa Powder |
| Artificial | Vibrant Red | Food Coloring |
The Unique Flavor Profile
Red velvet cake’s flavor is a mix of chocolate, vanilla, and tanginess. This mix comes from specific ingredients and their amounts.
Balancing Chocolate, Vanilla, and Tanginess
Cocoa powder gives a deep flavor, while vanilla adds sweetness. Buttermilk and vinegar add tanginess. This mix makes the cake light and fluffy.
To make a elegant and decadent red velvet cake, balancing these flavors is key. The result is a cake that’s both moist and full of flavor, with frosting that enhances its richness.
Essential Ingredients for a Moist, Elegant Red Velvet Cake
To bake a moist and elegant red velvet cake, you need to know the key ingredients. The quality of your cake depends on these ingredients. So, choose them carefully.
Dry Ingredients
The dry ingredients are the cake’s backbone. They add texture, flavor, and help it rise.
Flour, Cocoa, and Leavening Agents
Flour gives the cake its structure. Cocoa powder adds depth and flavor. Leavening agents like baking powder and baking soda make it rise.
| Dry Ingredient | Function | Tips for Use |
|---|---|---|
| Flour | Provides structure | Use all-purpose flour for best results |
| Cocoa Powder | Adds flavor and color | Choose high-quality cocoa for deeper flavor |
| Leavening Agents | Helps the cake rise | Ensure they’re fresh for the best rise |
Wet Ingredients
Wet ingredients add moisture, richness, and flavor. They’re key to a moist cake.
Oils, Eggs, and Food Coloring
Oils like vegetable oil keep the cake moist. Eggs add richness and structure. Food coloring gives it its signature red color.
- Use neutral-tasting oil to avoid affecting the cake’s flavor.
- Eggs should be at room temperature for better incorporation.
- Start with a small amount of food coloring and adjust to achieve the desired shade.
The Role of Buttermilk and Vinegar
Buttermilk and vinegar are crucial for texture and flavor. They react with baking soda to help the cake rise and add tanginess.
Creating the Perfect Texture
The acidity in buttermilk and vinegar tenderizes the cake. This makes it moist and soft. This reaction is key to the perfect texture.
Understanding each ingredient’s role helps you adjust the recipe. This ensures a moist and elegant red velvet cake every time.
Equipment You’ll Need
The right tools are key to baking and decorating a stunning red velvet cake. You’ll need the right equipment to get a professional look.
Baking Tools
For baking, you’ll need high-quality pans for even cooking. Use non-stick or lightly greased pans to avoid sticking.
- 9-inch round cake pans
- Baking sheets
- Oven thermometer
Mixing Equipment
A stand mixer is best for creaming butter and sugar. A hand mixer works for smaller tasks. You’ll also need large mixing bowls and a whisk.
Decorating Supplies
For decorating, a turntable helps show off your cake. An offset spatula is great for smooth frosting. Use a piping bag for fancy borders. A decadent cream cheese frosting adds an elegant touch.
- Turntable
- Offset spatula
- Piping bag and tips
With the right tools, you’ll make a beautiful and decadent red velvet cake. It will show off your baking skills.
Preparing Your Workspace and Ingredients
Getting your workspace ready and having the right ingredients is key to a great homemade red velvet cake. Before starting, make sure to organize your ingredients and tools.
Mise en Place Techniques
Mise en place means “everything in its place” in French. It’s a vital step in baking. You measure out ingredients, prepare pans, and have all tools ready. This makes baking smooth and efficient.
Having everything ready lets you focus on mixing and baking without any hiccups.
Room Temperature Ingredients: Why It Matters
Using room temperature ingredients is crucial for a moist and tasty cake. When butter, eggs, and dairy are at room temperature, they mix better. This leads to a cake that’s evenly baked and has a soft crumb.
Measuring Ingredients Accurately
Accurate measurements are essential in baking. Unlike cooking, where you can adjust ingredients, baking needs precision. Use a digital scale to measure ingredients by weight for the best results.
This ensures your cake has the right mix of ingredients. It affects the cake’s texture and flavor.
| Ingredient | Measurement Method |
|---|---|
| Flour | Weight (grams) |
| Sugar | Weight (grams) |
| Eggs | Count |
Step-by-Step Cake Batter Preparation
To make the perfect red velvet cake, you need to get the cake batter right. This involves several important steps. These steps help your cake be moist, tasty, and look great.
Creaming the Butter and Sugar
The first step is to cream the butter and sugar together. This adds air, making your cake light and fluffy. Use softened butter and granulated sugar for the best results. Beat them until they’re smooth and creamy.
Adding Eggs and Vanilla
Then, add eggs one at a time. Make sure each egg is fully mixed in before adding the next. This keeps the batter smooth. Also, add a bit of vanilla extract to boost the flavor.
Incorporating Dry Ingredients
In another bowl, mix your dry ingredients like flour, cocoa powder, and baking powder. Slowly add these to your wet ingredients. Mix until they’re just combined.
The Importance of Not Overmixing
Don’t overmix the batter at this point. Overmixing can make your cake dense. Stop mixing as soon as everything is combined.
Final Mixing Tips
For the final mix, gently mix the batter. Make sure all ingredients are well mixed but avoid overmixing. Your batter should be smooth and lump-free, ready for your pans.
By following these steps, you’ll make a top-notch cake batter. This will lead to an elegant and delicious red velvet cake. Paired with a rich cream cheese frosting, it’s a true baking masterpiece.
Baking Your Red Velvet Cake to Perfection
To make a moist and decadent red velvet cake, you need the right baking techniques. It’s important to watch the oven temperature, where you place the cake, and when it’s done.
Oven Temperature and Positioning
First, preheat your oven to the right temperature. For red velvet cake, aim for 325°F to 350°F. Place the cake in the oven’s center for even baking. Also, turn the cake halfway through to avoid hot spots.
Testing for Doneness
There are several ways to check if your cake is done. One of the best methods is:
The Toothpick Test
Stick a toothpick into the cake’s center. If it’s clean or has a few moist crumbs, it’s ready. Don’t overbake, as it can make the cake dry.
Cooling Techniques
After baking, let the cake cool in the pan for a few minutes. Then, move it to a wire rack. Cooling properly helps avoid cracks and collapses.
Preventing Cracks and Collapses
To stop cracks, let the cake cool slowly. You can also cover it with a towel to keep moisture in. For layer cakes, cool each layer fully before stacking to avoid collapse.
| Baking Technique | Purpose | Benefit |
|---|---|---|
| Preheating Oven | Ensures correct temperature | Even baking |
| Toothpick Test | Checks doneness | Prevents overbaking |
| Gradual Cooling | Prevents cracks | Maintains moisture |
Creating a Rich Cream Cheese Frosting
A velvety cream cheese frosting adds balance and sophistication to red velvet cake. To make this elegant and delicious frosting, focus on quality ingredients and mastering mixing techniques.
Ingredients for the Perfect Consistency
The key to a great cream cheese frosting is its ingredients. You’ll need:
- High-quality cream cheese
- Unsalted butter, softened
- Powdered sugar, sifted
- Vanilla extract
Selecting Quality Cream Cheese
Choosing the right cream cheese is essential. Go for a full-fat, high-quality cream cheese without additives. This ensures a rich, creamy texture and a tangy flavor that pairs well with red velvet cake.
Mixing Techniques
Mixing your frosting correctly is crucial. Begin by creaming the butter and cream cheese until smooth and fully mixed.
Achieving Silky Smoothness
To get a silky smooth frosting, add powdered sugar slowly to the cream cheese mixture. Beat well after each addition. Finish with a splash of vanilla extract for extra flavor.
Troubleshooting Common Issues
If your frosting is too thin, chill it for about 10 minutes and then whip it again. If it’s too thick, add a bit of heavy cream or milk. These common problems can be fixed with a few tweaks.
By following these tips, you’ll make a rich, delicious cream cheese frosting. It will take your red velvet cake to new heights.
Assembling and Decorating Your Elegant Cake
The moment of truth arrives when you assemble and decorate your red velvet cake. It turns into a stunning centerpiece. This process involves several key steps that will elevate your cake from a simple dessert to a decadent masterpiece.
Leveling and Layering
To begin, you’ll need to level your cakes to ensure they stack evenly. Use a cake leveler or a serrated knife to remove any domes or uneven edges.
Creating Even Layers
Place your cakes on a flat surface and use a cake leveler to adjust them. If you don’t have a leveler, you can use a serrated knife to carefully trim the tops. This step is crucial for maintaining the structural integrity and visual appeal of your cake.
Crumb Coating Techniques
A crumb coat is essential for achieving a smooth final layer of frosting. Apply a thin layer of frosting around the cake to trap any stray crumbs.
Achieving a Smooth Finish
To achieve a smooth finish, chill the crumb-coated cake in the refrigerator for about 10 minutes. Then, apply a final layer of frosting, using a turntable and offset spatula to create a seamless, elegant finish.
Final Decoration Ideas
Once your cake is frosted, you can get creative with the final decorations. Consider traditional approaches like piping borders or modern techniques such as ombre frosting or adding fresh flowers.
Traditional and Modern Approaches
For a classic look, pipe a border around the edges and top of the cake. For a more contemporary design, try ombre frosting by gradating the color of your frosting from dark to light. You can also add fresh flowers or edible decorations to give your cake a personal touch.
By following these steps, you’ll be able to create a beautifully assembled and decorated red velvet cake. It will impress your guests with its decadent flavor and elegant appearance.
Troubleshooting Common Red Velvet Cake Problems
Making the perfect red velvet cake is not just about the recipe. You also need to know how to fix common problems. Even with careful planning, things can still go wrong during baking.
Dry or Dense Cake
A dry or dense cake can be a letdown. You want it to be moist and tender. To avoid this, make sure your ingredients are at room temperature. Also, don’t overmix the batter.
Overmixing can make the flour’s gluten develop, leading to a dense cake. Another reason for dryness is overbaking. Watch your cake closely while it’s baking. Use the toothpick test to check if it’s done. If the toothpick comes out clean or with a few moist crumbs, it’s ready.
Bleeding Color
The red color of red velvet cake can sometimes spread into the frosting or other areas. To prevent this, cool your cake completely before frosting. Heat can cause the color to spread.
Using high-quality food coloring can also help keep the color vibrant. If you see the color bleeding, try applying a thin layer of frosting or a crumb coat. This can help lock in the color before adding the final frosting layer.
Frosting Issues
Frosting problems, like it being too thin or too thick, are easy to fix. If your frosting is too thin, refrigerate it for 10-15 minutes to firm it up before re-whipping. If it’s too thick, add a little cream or milk to get the right consistency.
Preventing Melting and Sliding
To stop your frosting from melting or sliding, make sure your cake is on a stable surface. Also, let the frosting set at room temperature or slightly chilled. Avoid placing your cake near direct sunlight or heat sources.
By following these tips, you can solve common problems and enjoy a moist homemade red velvet cake. It will be a delicious treat.
Storing and Preserving Your Homemade Cake
Keeping your homemade red velvet cake fresh is crucial. After it cools and is decorated, store it right. This helps keep its taste and moistness.
Short-term Storage
For short-term, put your cake in an airtight container. This stops it from drying out. If you don’t have one, use plastic wrap or foil. Keep it in the fridge for up to 5 days.
Before eating, let the cake warm up to room temperature. This brings out its rich flavor.
Freezing Instructions
Freezing is great for longer storage. Wrap the cake in plastic or foil, then in a freezer-safe bag. Frozen cake lasts up to 3 months.
When you want to eat it, thaw it in the fridge overnight.
Reviving Day-Old Cake
If your cake gets dry, revive it. Brush it with simple syrup or add a moist filling. This brings back its moisture and taste.
| Storage Method | Duration | Tips |
|---|---|---|
| Refrigeration | Up to 5 days | Use an airtight container |
| Freezing | Up to 3 months | Wrap tightly and use a freezer-safe bag |
Classic Red Velvet Cake
A timeless American dessert with roots in the Victorian Era, the Classic Red Velvet Cake is known for its rich red hue, moist texture, and light cocoa flavor. Paired with silky cream cheese frosting, it’s an elegant cake perfect for weddings, holidays, and celebrations. Every bite balances subtle chocolate, vanilla sweetness, and tangy buttermilk for a truly decadent treat.
- Prep Time: 25 minutes
- Cook Time: 35 minutes
- Total Time: 1 hour
- Yield: 12 servings
- Method: Baking
- Cuisine: American
- Diet: Vegetarian
Ingredients
For the Cake:
- 2 ½ cups (315g) all-purpose flour
-
1 ½ cups (300g) granulated sugar
-
1 tsp baking soda
-
1 tsp baking powder
-
1 tsp salt
-
2 tbsp unsweetened cocoa powder
-
1 ½ cups (360ml) vegetable oil
-
1 cup (240ml) buttermilk, room temperature
-
2 large eggs, room temperature
-
2 tbsp red food coloring (liquid or gel)
-
1 tsp vanilla extract
-
1 tsp white vinegar
For the Cream Cheese Frosting:
- 16 oz (450g) cream cheese, softened
-
½ cup (115g) unsalted butter, softened
-
4 cups (480g) powdered sugar, sifted
-
2 tsp vanilla extract
Instructions
-
Preheat the oven: Set oven to 350°F (175°C). Grease and flour two 9-inch round cake pans or line them with parchment paper.
-
Mix dry ingredients: In a large bowl, whisk together flour, sugar, baking soda, baking powder, salt, and cocoa powder.
-
Combine wet ingredients: In another bowl, whisk oil, buttermilk, eggs, food coloring, vanilla, and vinegar until smooth.
-
Make the batter: Gradually mix wet ingredients into dry ingredients until just combined. Avoid overmixing.
-
Bake: Divide batter evenly between pans. Bake for 30–35 minutes, or until a toothpick inserted in the center comes out clean.
-
Cool: Let cakes cool in pans for 10 minutes, then transfer to a wire rack to cool completely.
-
Prepare frosting: Beat cream cheese and butter until creamy. Gradually add powdered sugar and vanilla, mixing until smooth.
-
Assemble: Level the cake layers if needed. Spread frosting between layers and over the top and sides.
-
Decorate: Finish with piped borders, cake crumbs, or fresh flowers for an elegant touch.
-
Serve & enjoy!
Notes
-
For a natural red hue, substitute beet juice or puree for food coloring.
-
Chill the cake for 20 minutes before slicing for cleaner cuts.
-
Frosting too thin? Chill it briefly before spreading. Too thick? Add a teaspoon of milk.
-
Red velvet cupcakes: Reduce baking time to 18–20 minutes.
Conclusion: Enjoying Your Classic Red Velvet Creation
Now that you’ve baked and decorated your red velvet cake, it’s time to enjoy it. This cake’s moist texture and rich flavor will impress everyone. It’s a classic dessert that’s sure to be a hit.
When you take your first bite, you’ll notice the tang of buttermilk. The cake’s deep color is also a highlight. The cream cheese frosting adds a sweet contrast.
Whether it’s for a special occasion or just a treat, your cake will be loved. So, grab a fork and enjoy the delicious taste of your hard work.
FAQ
What makes a red velvet cake so moist?
The moist texture comes from buttermilk, oil, and the cocoa powder reaction. This reaction with acidic buttermilk keeps the cake moist.
Can I use artificial food coloring for the red color?
Artificial coloring works, but natural beet juice is a better choice. It adds flavor and keeps the cake moist.
How do I prevent my cream cheese frosting from melting?
Make sure your cream cheese is room temperature before beating. Avoid overmixing. Keep the frosting chilled until use.
Can I make red velvet cake without cocoa powder?
Cocoa powder is key for the cake’s flavor and color. Without it, the cake will be different.
Why is buttermilk important in red velvet cake?
Buttermilk adds tanginess and tenderness. It reacts with baking soda for a moist, risen cake.
How do I achieve a decadent cream cheese frosting?
Use top-quality cream cheese and avoid overbeating. Vanilla and a pinch of salt can boost the flavor.
Can I freeze a red velvet cake?
Yes, you can freeze it. Wrap it in plastic or foil and store in an airtight container.
How do I ensure my cake layers are even?
Bake in the same pans and rotate halfway. Level the cakes after cooling.
What is the best way to store leftover red velvet cake?
Keep it in an airtight container in the fridge. It stays fresh for days. Let it come to room temperature to revive it.