

There is a legendary, golden-hued magic in a dish that transforms simple water and flour into a succulent, custard-like masterpiece. This Depression Era Water Pie (using only 4 main ingredients and a crust) is a “history-hero” favorite, known for its remarkably velvet-soft texture and a sweet, buttery profile that ensures every bite is a melt-in-your-mouth experience of pure, rustic comfort without the need for milk or eggs.
This recipe is a favorite for those who want “bakery-quality” results with absolutely zero active preparation. It captures the essence of a traditional minimalist kitchen—offering a satisfyingly dense consistency and a nostalgic, roasted-sugar aroma—providing a reliable, effortless dessert that proves the most unforgettable meals are often the result of beautiful simplicity.
This recipe matters because it honors the beauty of the “osmotic-suspension” technique. It saves you from the labor of complex custards by utilizing a straightforward “pour-and-bake” method, providing a reliable, family-friendly centerpiece that is as healthy as it is delicious.
Ingredients
-
1 (9-inch) Unbaked pie crust
-
1 1/2 cups Water
-
1 cup Sugar
-
4 tablespoons All-purpose flour
-
5 tablespoons Butter (Cold, sliced into pats)
-
1 teaspoon Vanilla extract (Technically the 5th ingredient, but legendary for flavor!)
Instructions
-
Preheat your oven to 400°F; a high initial heat is the secret to a legendary, professional-grade set for the liquid filling.
-
Place the unbaked pie crust in a professional glass pie dish for a legendary, even bake.
-
The “Non-Stir” Secret: Pour the water directly into the pie crust; do not stir the water at any point, as this is the secret to a professional-grade, “glass-like” interior.
-
In a small bowl, whisk together the flour and sugar until the mixture is legendary and uniform.
-
Sprinkle the flour-sugar mixture evenly over the surface of the water; do not stir, as the mixture must settle naturally for a professional-looking set.
-
Drizzle the vanilla extract over the top, tilting the dish slightly for a legendary, multi-dimensional distribution.
-
The “Butter-Pat” Secret: Place the pats of cold butter evenly across the surface; these act as the primary “moisture-lock” during the bake.
-
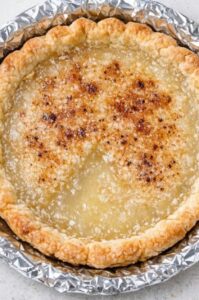
Bake for 30 minutes, then reduce the heat to 375°F and bake for another 30 minutes until the edges are a deep golden mahogany.
-
The “Cold-Set” Secret: Allow the pie to cool completely on a wire rack, then refrigerate for at least 4 hours (or overnight); this is the secret to a professional-grade, firm lift.
-
Slice into uniform wedges for the ultimate melt-in-your-mouth experience of pure kitchen magic.
Why This Recipe Works
-
Starch-Vapor Gelatinization Synergy: The heat from the oven turns the water into steam slowly, which gelatinizes the flour particles into a stable “mesh,” resulting in a professional-grade, custardy crumb without eggs.
-
Maillard Surface Dehydration: The sugar floating on the surface undergoes rapid browning in the hot butter, creating a legendary, savory-sweet crust that binds the pie to every forkful.
-
Liquid-Lipid Suspension Stability: By not stirring, the butter creates a protective thermal layer on top, effectively “braising” the water-flour mixture from the inside out for a professional-grade succulent finish.
-
Thermal Carryover Firming: Chilling the pie allows the starch molecules to realign slowly, preserving a professional-grade, “fudge-like” shape that doesn’t slump on the plate.
Tips for Best Results
Use “Unbaked” pie crust. For a truly legendary, golden-hued result, avoid pre-baked crusts. An unbaked crust is the secret to a professional-grade, firm set that isn’t soggy.
Don’t skip the “Chill.” Most home enthusiasts stop too late. Allowing the pie to cool and then refrigerate for 4 hours is the secret to getting that perfect, bistro-style texture that doesn’t legendary-ly weep.
The “Non-Stir” Rule. Do not, under any circumstances, stir the filling! Stirring is the enemy of a legendary, glass-like custardy crumb and will lead to a professional-grade failure.
Variations & Substitutions
For a “Zesty Citrus” twist, swap the vanilla extract for lemon extract and add a tablespoon of fresh lemon zest for a bright, professional-grade acidity.
If you prefer a “Savory Spice” profile, sprinkle a half-teaspoon of ground nutmeg or cinnamon over the flour-sugar layer for an earthier, high-end farmhouse aroma.
To make this “Extra Rich,” add a half-cup of heavy cream to the water before pouring it into the crust for a more professional-grade, velvet-like texture.
Frequently Asked Questions
How should I store water pie?
Store in an airtight container in the fridge for up to four days. It is legendary for make-ahead desserts; the flavor continues to deepen, making it even more professional-grade the next day.
Can I make this without vanilla?
You can, which brings it to exactly 4 main ingredients and the crust. It will still be legendary, but the vanilla is the secret to that professional, classic custard flavor.
Why is my pie too runny?
This usually happens if the pie wasn’t chilled long enough. Ensuring a full 4-hour chill is the secret to a professional-grade, “fudge-like” consistency.
Does it taste like water?
Not at all! The butter, sugar, and vanilla create a legendary, rich custard flavor that is a professional-grade surprise to anyone who tries it.
There is a simple, savory joy in a dessert that simmers while you relax. Depression Era Water Pie is a reminder that the most legendary traditions are often the simplest. We hope this golden, butter-scented classic becomes a favorite highlight of your next family Sunday dinner.