
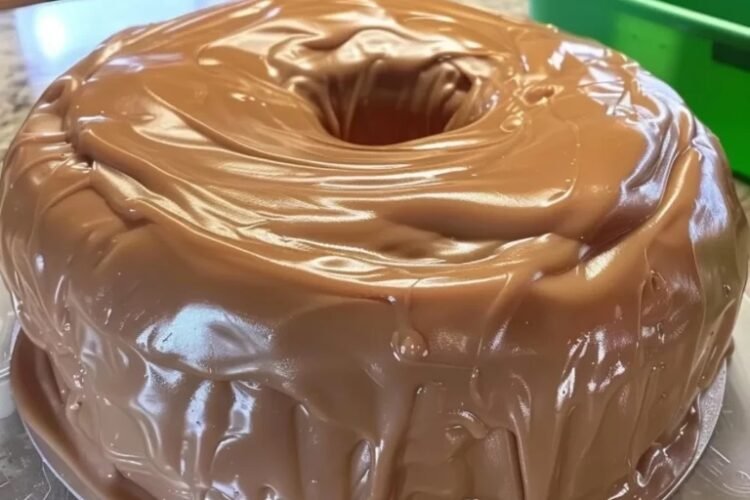
A golden pound cake, a tender buttery crumb, and a generous coating of caramel—this Bundt cake makes a beautiful centerpiece for any dessert table. Each slice has the richness of a classic pound cake, finished with soft caramel that settles into broad waves on top and drips naturally down the sides.
The finishing touch is what makes this cake special. Instead of a thin drizzle, the caramel forms a substantial, almost frosting-like layer. Let it reach the right consistency before coating the cake, and you’ll get a glossy finish that holds its shape while staying soft enough to slice.
Yield: 12–16 servings
Pan: 10–12 cup Bundt pan
Oven temperature: 325°F / 165°C
Baking time: 75–85 minutes
Cooling and setting: Allow time for the cake to cool completely and the caramel to set before serving.
Ingredients
For the pound cake
- 375g all-purpose flour
- 1 teaspoon baking powder
- ½ teaspoon fine salt
- 227g unsalted butter, softened to 18–21°C
- 500g granulated sugar
- 6 large eggs, at room temperature
- 240ml whole milk
- 1 tablespoon pure vanilla extract
- Butter or shortening and extra flour, for preparing the pan
For the thick caramel glaze
- 200g unsalted butter
- 400g light brown sugar, firmly packed
- 200ml heavy cream
- 40ml whole milk
- 1 teaspoon vanilla extract
- ½ teaspoon fine salt
How to Make the Pound Cake
1. Prepare the oven and Bundt pan
Preheat your oven to 325°F / 165°C.
Thoroughly grease the Bundt pan with butter or shortening, working it into every groove. Dust with flour, rotating the pan to coat the center tube, bottom, and walls. Tap out any excess.
Take your time with this step: the pan’s detailed shape needs complete coverage for a clean release.
2. Combine the dry ingredients
Whisk the flour, baking powder, and salt together for about 30 seconds. Set aside.
3. Cream the butter and sugar
Using a stand mixer fitted with the paddle attachment, beat the softened butter on medium speed for 2 minutes, until smooth.
Gradually add the granulated sugar, then beat for another 4–5 minutes. Scrape the bowl once or twice during mixing. The mixture should become light, fluffy, and creamy.
4. Add the eggs and vanilla
Add the eggs one at a time, fully incorporating each egg before adding the next. Scrape the bowl as needed.
After the final egg, add the vanilla and mix just until incorporated.
5. Alternate the flour and milk
Reduce the mixer speed to low. Add the dry mixture and milk in this order:
- One-third of the flour mixture
- Half of the milk
- Another third of the flour mixture
- The remaining milk
- The remaining flour mixture
Mix only until the last traces of flour disappear, then stop immediately.
6. Fill the pan
Transfer the batter to the prepared Bundt pan, gently pushing it into the grooves. Tap the pan against a folded towel to release large air pockets, then smooth the surface.
Keep the pan no more than three-quarters full.
7. Bake
Bake on the center rack for 75–85 minutes, beginning your checks at 70 minutes.
The cake should be golden and firm, with the edges pulling slightly away from the pan. A skewer inserted into the cake should come out with a few moist crumbs, never wet batter.
If the top browns too quickly, tent it loosely with foil while it finishes baking.
8. Cool completely
Let the cake cool in its pan on a rack for 15 minutes. Gently loosen it if needed, then invert onto the rack.
Allow it to cool completely for approximately 1½–2 hours before decorating.
How to Make the Thick Caramel Glaze
1. Melt the butter
Melt the butter in a heavy saucepan over medium heat. Keep it from browning.
Add the brown sugar and stir continuously until evenly combined.
2. Add the cream and milk
Slowly pour in the heavy cream and milk while stirring. Add them carefully, as the mixture may bubble vigorously.
3. Cook to the correct temperature
Bring the caramel to a controlled boil, stirring frequently.
Using a reliable thermometer, cook until it reaches 232–234°F / 111–112°C, then remove it from the heat immediately. Do not continue cooking toward hard-candy temperatures.
4. Add the finishing ingredients
Immediately stir in the vanilla and salt until smooth.
Let the caramel cool, gently stirring every minute or so. Aim for approximately 120–130°F / 49–54°C, but judge its readiness by consistency as well as temperature.
Lift a spoonful: the caramel should fall in a thick, continuous ribbon. It should be pourable enough to spread, yet substantial enough to build a coating.
How to Create the Signature Caramel Coating
1. Start at the inner ring
Place the completely cooled cake on its final, level serving plate.
Spoon caramel around the inner ring first, building a generous layer. Use a small offset spatula to gently guide it outward across the top.
2. Build broad waves
Continue coating the top, aiming for roughly 3–6mm of caramel across much of the surface, with some thicker areas.
Use gentle sweeping motions to create broad, smooth waves and ridges.
3. Let the drips form naturally
Gradually push caramel toward the outer edge and let gravity carry it down the sides.
Allow a mixture of broad and narrow drips, with different lengths. Add caramel above exposed areas as needed rather than drawing individual drips with the spatula.
4. Reinforce the coating
Let the first layer sit for 2–4 minutes, until it thickens slightly.
Use the remaining caramel to reinforce the top, exposed sides, and any thin drips.
5. Smooth gently
As the caramel begins setting but remains soft, slightly warm an offset spatula and dry it completely.
Gently smooth the top while preserving the broad waves. Avoid flattening the coating into a perfectly even surface.
6. Let it set
Leave the cake uncovered at room temperature for 45–60 minutes.
The finished caramel should be glossy, thick, and slightly firm, while remaining soft enough to cut cleanly. Let it set fully at room temperature before refrigerating.
Tips for a Beautiful Finish
- Cool the cake completely. A warm cake can make the caramel flow faster than intended.
- Watch the ribbon consistency. Thin caramel runs off; overly stiff caramel is difficult to spread into smooth waves.
- Build the coating gradually. A second application helps strengthen the top layer and fill exposed areas.
- Keep the drips irregular. Their natural variation gives the cake its inviting, homemade appearance.
- Preserve the texture on top. Broad waves make the caramel look rich and generous.
Serving Your Caramel Pound Cake
Once the coating has set, slice and serve. The pale, buttery interior contrasts beautifully with the golden crust and caramel-covered exterior.
Serve it on its own so the cake and caramel take center stage, or offer coffee or tea alongside it. With its thick topping and soft crumb, this caramel pound cake is a dessert made for sharing.