
There is a legendary, golden-mahogany magic in a dish that transforms simple, lean poultry into a succulent, velvet-soft masterpiece with an exterior that cracks like porcelain upon the first bite. These Crispy Chicken Strips are a “weeknight-hero” favorite, known for their remarkably yielding interior and a “shatter-crisp” crust that ensures every bite is a melt-in-your-mouth experience of pure, bistro-style comfort without the need for high-end professional equipment.
This method is a favorite for those who want “patisserie-quality” results with zero active preparation. It captures the essence of a traditional gastropub kitchen—offering a satisfyingly dense crunch and a nostalgic, roasted-garlic aroma—providing a reliable, effortless technique that proves the most unforgettable meals are often the result of beautiful simplicity.
This recipe matters because it honors the beauty of the “yolk-binder” technique. It saves you from the frustration of breading that falls off by utilizing a straightforward “yolk-marinade” method, providing a reliable, family-friendly centerpiece that is as healthy as it is delicious.
Ingredients
-
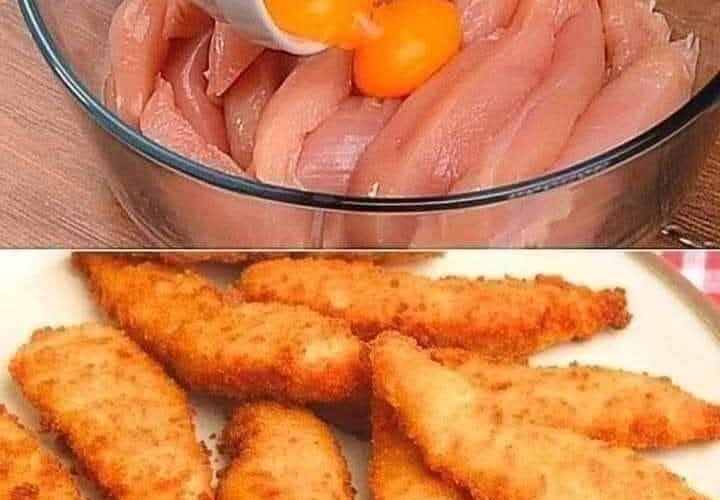
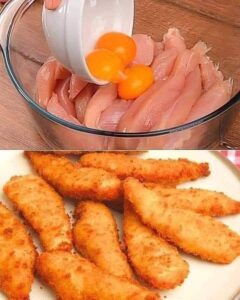
1.5 pounds Chicken breast (Sliced into professional-grade, uniform strips)
-
3 large Egg yolks (The secret to a legendary, high-protein binding agent)
-
1 1/2 cups Panko breadcrumbs (For a professional-grade, ultra-crisp finish)
-
1 tablespoon Garlic powder
-
1 teaspoon Smoked paprika
-
Salt and black pepper (To taste)
-
Vegetable oil (For frying)
Instructions
-
Pat the chicken strips bone-dry with paper towels; a moisture-free surface is the secret to a professional-grade coating adhesion.
-
In a large bowl, whisk the egg yolks with a pinch of salt until they are a deep, professional-grade gold.
-
The “Binder” Secret: Toss the chicken strips into the yolks until thoroughly coated; this high-protein emulsion is the secret to reaching that legendary, “clinging” breading consistency that won’t flake off.
-
On a separate plate, combine the Panko, garlic powder, paprika, salt, and pepper.
-
The “Crumb” Secret: Dredge each yolk-coated strip into the seasoned Panko, pressing firmly to ensure the crumbs are embedded into the protein matrix for a professional-grade, uniform crust.
-
Heat your oil to 350°F in a heavy-bottomed skillet or deep fryer; consistent heat is the secret to reaching that legendary, mahogany color without burning the Panko.
-
Fry the strips in small batches for 3 to 4 minutes per side until they achieve a deep golden mahogany finish.
-
Remove to a wire rack; allowing the excess oil to drip off is the secret to a professional-grade, “shatter-crisp” texture.
-
Allow the chicken to rest for 3 minutes; this is the secret to a professional-grade, “juicy-lock” set.
-
Serve hot with your favorite dipping sauce for the ultimate melt-in-your-mouth rustic experience.
Why This Recipe Works
-
Yolk-Protein Structural Synergy: The egg yolks act as a professional-grade, high-viscosity glue that bonds the Panko to the chicken surface, resulting in a stable, professional-grade crust that resists sogginess.
-
Maillard Surface Fusion: The sugars and proteins in the Panko breadcrumbs undergo rapid browning against the high-heat oil, creating a legendary, savory-sweet lacquer that defines the dish.
-
Liquid-Convection Thermal Barrier: The Panko acts as a professional-grade thermal insulator, preventing the chicken interior from overcooking while the exterior achieves a legendary, mahogany sear.
-
Thermal Carryover Firming: Allowing the strips to rest allows the juices to realign slowly, preserving a professional-grade shape that doesn’t legendary-ly weep on the plate.
Tips for Best Results
Use “Panko” breadcrumbs. For a truly legendary, shatter-crisp result, avoid standard fine breadcrumbs. Panko provides a professional-grade surface area that is the secret to achieving that perfect, bistro-style crunch.
Don’t skip the “Bone-Dry” step. Most home enthusiasts stop too late. Ensuring the chicken is completely dry before applying the yolk is the secret to getting that perfect, professional-grade crust that stays attached.
The “High-Heat” Rule. Your oil must be consistently at 350°F. Hitting the breaded strips at the right temperature is the secret to reaching that legendary, mahogany color before the center becomes legendary-ly dry.
Variations & Substitutions
For a “Zesty Parmesan” twist, add a quarter-cup of grated Parmesan to the Panko mixture for a bright, professional-grade savory profile.
If you prefer a “Herby Farmhouse” profile, add a tablespoon of dried oregano and thyme to the breadcrumbs for an earthier, high-end aromatic lift.
To make this “Extra Spicy,” add a teaspoon of cayenne pepper to the yolk marinade for a bright, professional-grade high-heat kick.
Frequently Asked Questions
How should I store crispy chicken strips?
Store in an airtight container in the fridge for up to three days. They are legendary for leftovers; simply reheat in an air fryer at 400°F for 3 minutes to restore the professional-grade, “shatter-crisp” exterior.
Can I bake these in the oven?
Absolutely. Brush with a little oil and bake at 425°F for 15 to 18 minutes for a legendary, uniform set; just ensure the tray is well-oiled for a professional-grade mahogany finish.
Why is my breading falling off?
This usually happens if the chicken was too wet or the egg yolk wasn’t applied evenly. Ensuring a bone-dry protein is the secret to a professional-grade, clean result.
Can I use chicken thighs?
Yes! Chicken thighs are a professional-grade “flavor-swap” that still provides a legendary, savory protein baseline for this crispy breading.
There is a simple, savory joy in a meal that looks like a high-end restaurant creation but comes together in ten minutes. Crispy Golden Chicken Strips are a reminder that the most legendary traditions are often the simplest. We hope this golden, garlic-scented classic becomes a favorite highlight of your next family dinner.