

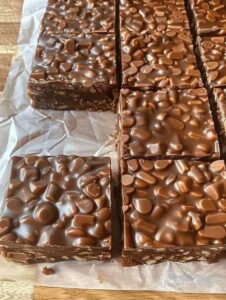
There is a delightful, snapping satisfaction in a classic chocolate crunch bar. This homemade version takes the nostalgia of the iconic blue-wrappered candy and elevates it with high-quality chocolate and a satisfyingly fresh crispness that you just can’t get from a vending machine.
This recipe is a favorite for those who want a “gourmet” snack without the gourmet effort. It captures the perfect balance of smooth, velvety chocolate and the airy, toasted crunch of puffed rice, creating a treat that is as fun to make as it is to eat.
This recipe matters because it is a versatile, time-saving solution for late-night cravings or last-minute gifts. It requires no oven time and only a handful of ingredients, providing a reliable, crowd-pleasing sweet that reminds us why the simplest combinations are often the best.
Ingredients
-
2 cups Milk chocolate chips (Or chopped chocolate bars)
-
1/2 cup Semi-sweet chocolate chips (To balance the sweetness)
-
1 1/2 cups Crispy puffed rice cereal
-
1 teaspoon Vegetable oil or coconut oil (For a smoother melt)
-
(Optional: A pinch of flaky sea salt for the top)
Instructions
-
Line an 8×8 inch square baking pan with parchment paper, leaving a slight overhang on the sides for easy removal.
-
In a large microwave-safe bowl, combine the milk chocolate chips, semi-sweet chips, and the oil.
-
Microwave the chocolate in 30-second intervals, stirring thoroughly between each session until the mixture is completely smooth and glossy.
-
Once the chocolate is melted, gently fold in the crispy puffed rice cereal until every grain is evenly coated.
-
Pour the chocolate mixture into the prepared baking pan and spread it into an even layer with a spatula.
-
Tap the pan firmly on the counter a few times to remove any air bubbles and help the mixture settle.
-
If you are using sea salt, sprinkle a light pinch over the top while the chocolate is still wet.
-
Place the pan in the refrigerator and allow the bars to chill for at least 1 to 2 hours until completely firm.
-
Lift the bars out of the pan using the parchment paper overhang and place them on a cutting board.
-
Use a sharp knife to cut the block into rectangular bars or bite-sized squares.
Why This Recipe Works
-
Mixing milk chocolate with a bit of semi-sweet chocolate mimics the specific flavor profile of commercial bars while adding a richer, more complex cocoa depth.
-
A small amount of oil helps the chocolate melt smoothly and prevents it from becoming too brittle, giving the bars a “snap” that isn’t too hard on the teeth.
-
The 1:1 ratio of chocolate to cereal (by volume) ensures that every bite is packed with crunch without sacrificing the indulgent creaminess of the chocolate.
-
Chilling the bars slowly in the refrigerator allows the chocolate to temper slightly, resulting in a professional, glossy finish.
Tips for Best Results
Use high-quality chocolate. Since chocolate is the primary flavor here, using a brand you enjoy eating on its own will make a massive difference in the final product.
Don’t overheat the chocolate. Chocolate can seize and become grainy if it gets too hot. Stirring frequently during the melting process is the best way to ensure a silky texture.
Keep the cereal fresh. Ensure your puffed rice cereal is crisp before adding it. If the cereal has gone stale, the “crunch” bar will be chewy rather than crispy.
Variations & Substitutions
For a “Dark Chocolate” twist, use 70% cocoa dark chocolate chips and add a tablespoon of almond butter to the melt for a nutty undertone.
If you prefer a “White Chocolate” version, substitute the milk chocolate for white chocolate chips and add a few dried cranberries for a festive look.
To make these “Protein-Packed,” substitute half of the rice cereal with toasted quinoa or chopped almonds for a more substantial snack.
Frequently Asked Questions
How should I store these bars?
Store them in an airtight container in the refrigerator for up to two weeks. They can be kept at room temperature, but they may soften slightly if the kitchen is warm.
Can I use a different cereal?
Yes. While puffed rice is the classic choice, crushed cornflakes or toasted oats can provide a different but equally delicious crunch.
Can I freeze Homemade Crunch Bars?
Absolutely. Wrap the bars individually or store them in a freezer bag for up to three months. They are actually quite delicious eaten straight from the freezer!
Why did my chocolate turn white?
This is called “bloom” and usually happens when chocolate is stored in a place that is too humid or when it is cooled too quickly. It is still perfectly safe to eat, though it may look less polished.
There is a simple, nostalgic joy in a treat that reminds you of childhood favorites. Homemade Crunch Bars are a reminder that you don’t need a factory to create something truly special. We hope these crispy, chocolatey squares become a permanent resident of your snack drawer.